Static Webpage With Terraform
Creating a Static Website by Using terraform-aws-staticwebsite Module
In this post we are going to create a static website on AWS by using terraform-aws-staticwebsite. You can check the module from here terraform-aws-staticwebsite.
Introduction
S3 is an AWS storage service which is created to host files as objects. S3’s feature static website hosting allows us to serve our files in a webserver and made it reachable from internet.
Cloudfront is an AWS caching solution which allows us to share our static/dynamic content accross world. With Cloudfront you can distribute your content easily and made your customers to reach your content fastly thanks to it’s caching capabilities.
S3 and Cloudfront can be combined to share your static content and reach every place on earth with minimum speed and engineering overhead.
In this post we are going to utilize a module which is using S3 and Cloudfront for the purpose we mentioned above.
Before Starting
Before using this module it is considered that you already have a configured hosted zone in Route53. In addition, a certificate in us-east-1 (N.Virginia) must be created for Cloudfront. Currently CloudFront only supports certificates from N.Virginia region of AWS. More Info. You can create a certificate from AWS console or any other IaC solutions. In this post i have used terraform.
I have already have a hosted zone called umutakkaya.com(This website 😃). Let’s create a certificate for mywebsite.umutakkaya.com. Following terraform code will create both certificate and it’s validation.
data "aws_route53_zone" "umutakkayacom" {
  name         = "umutakkaya.com"
  private_zone = false
}

resource "aws_acm_certificate" "new_cert" {
  provider = aws.us-east-1
  domain_name       = "mywebsite.umutakkaya.com"
  validation_method = "DNS"
}

resource "aws_route53_record" "cert-validation-records" {
  for_each = {
    for dvo in aws_acm_certificate.new_cert.domain_validation_options : dvo.domain_name => {
      name   = dvo.resource_record_name
      record = dvo.resource_record_value
      type   = dvo.resource_record_type
    }
  }

  allow_overwrite = true
  name            = each.value.name
  records         = [each.value.record]
  ttl             = 60
  type            = each.value.type
  zone_id         = data.aws_route53_zone.umutakkayacom.zone_id
}

resource "aws_acm_certificate_validation" "cert-validation" {
  provider = aws.us-east-1
  certificate_arn         = aws_acm_certificate.new_cert.arn
  validation_record_fqdns = [for record in aws_route53_record.cert-validation-records : record.fqdn]
}

provider "aws" {
  alias               = "us-east-1"
  region              = "us-east-1"
}
After apply you can check it from AWS Console.

Importing the Module
Create a new file and import terraform module by using module keyword in terraform. Then supply the folowing arguments for the module. For the information about these arguments please refer website of the module. Then apply the changes.
module "staticwebsite" {
  source  = "umut-akkaya/staticwebsite/aws"
  version = "1.0.0"
  domainname = "mywebsite.umutakkaya.com"
  create_dns = true
  is_root = false
  route53_hosted_zone_id = data.aws_route53_zone.umutakkayacom.id
  ssl_acm_certificate_arn = aws_acm_certificate.new_cert.arn
}
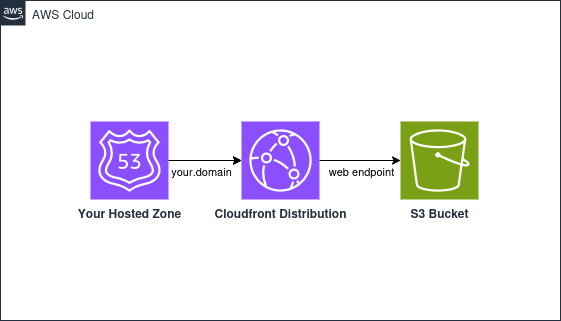
The module creates a S3 Bucket and a CloudFront Distribution. It might take 15 minutes to create CF Distribution. Components (S3 and Cloudfront) are connected by custom origin and the contents in S3 will be transfered to CloudFront edge locations and PoP’s. At the end the following architecture will be created.
Populate the Bucket
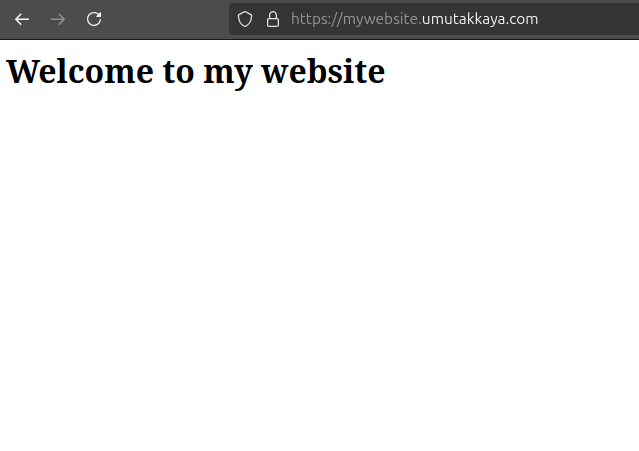
Now when we go to mywebsite.umutakkaya.com we might get 404 error. Because we have our S3 bucket and Distribution but no static data. For the purpose let’s upload some content to website. The S3 bucket’s website is named s3-websitename. After installing the website Cloudfront will consume the content. 🚀
Conclusion
With the module terraform-aws-staticwebsite we can easily create static website and distribute our content accross world.